All of a sudden the mornings are darker and the evenings are chilly… Yip, Winter will soon be upon us. Why not whip up a cute slouchy beanie in time for Winter?
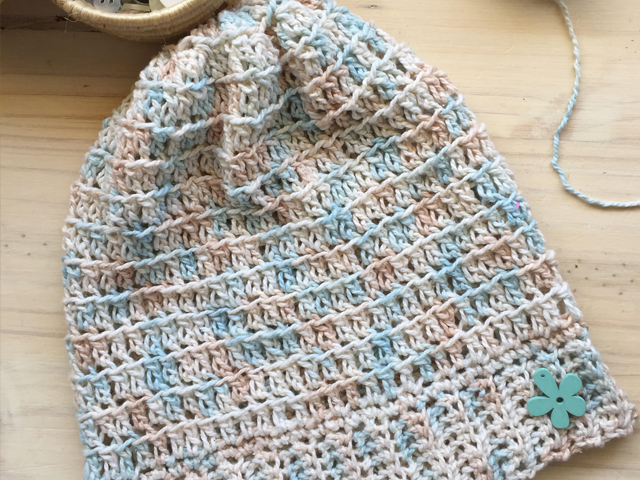
I love this beanie because it is loose and comfy and keeps my head nice and toasty warm.
This pattern is simple to follow and it is absolutely possible to whip up one of these beanies in an evening (it took me two evenings because I am kept ridiculously busy during the day/early evening with a very energetic three-year old!).
This is what I used to make my slouchy beanie
- 6.5mm crochet hook
- Moya 100% Cotton (Double knit 50g – 135m) – Made in South Africa
- Yarn needle
Note: The best thing about this pattern is that you can actually use any size hook / yarn. Simply add stitches and rows for smaller yarn and hooks and eliminate stitches and rows if you want to use a bigger hook and bigger yarn. You can measure it as you go and make a beanie that is perfectly unique.
Abbreviations
- Ch – Chain
- Sc – Single crochet
- Blo – Back loop only
- Sl st – Slip stitch
- Dc – Double crochet
- Dc2tog – Double crochet 2 together (decrease)

How to Crochet the Ribbing
Ch 9
Row 1: Sc in 2nd ch from hook and in every stitch across (8)
Row 2: Ch 1, turn, sc in first stitch, sc blo in next 6 stitches, sc in last stitch (8)
Repeat row 2 until you have down 58 rows
Bring both ends of the ribbing together. Sc both ends together. Do not fasten off.
You are now going to work in rounds around the ribbed brim of the beanie.

How to Crochet the Top of the Beanie
Round 1: Ch 1, sc evenly around working 1 sc in the end of each row, join to first sc with sl st.
Round 2: Ch 2, dc in each stitch around, join to first dc with sl st.
Round 3: Ch 2, dc in blo in each stitch around, join to first dc with sl st.
Repeat round 3 until you have crocheted 12 rounds.
Now for the tricky part… in the next two rounds you are going to decrease the number of stitches using dc2tog in the blo.
Round 13: Ch 2, “dc blo, dc2tog blo”, repeat from ” to ” around, join to first dc with sl st.
Round 14: Ch 2, “dc blo, dc2tog blo”, repeat from ” to ” around ending with 1 dc, join to first dc with sl st.
Fasten off. Leave long end for sewing.
Using your yarn needle, weave the long end in and out of the top loops of the last round.
Pull the end tight and close the circle. Sew the top closed.
*Tip: Add a button or any other little trinket to finish your beanie off nicely.
I get so excited when I successfully complete a crochet project! And this one I am particularly proud of because it’s the first project I have done working in the round. Now I have a new crochet skill that I can apply to a whole heap of new and exciting projects.
I really hope you try this beanie pattern out for yourself. Happy crocheting!
